
You start in quiet Waikiki dawn, then chase loud surf and food-truck smoke around Oahu in one clean loop. Plan your shot list by light and traffic, not just the map. Catch sunrise at Diamond Head, quick clips at Halona and Makapuʻu, then save midday for North Shore waves, shrimp plates, and street scenes in Haleiwa. A few hidden lookouts can change the whole edit, if you know when to pull over.
Key Takeaways
- Plan a 6–10 hour clockwise loop, starting pre-sunrise in Waikiki or Diamond Head and ending near North Shore for softer sunset beach color.
- Match shots to light and route: sunrise Waikiki, morning Halona and Makapuʻu, midday North Shore surf, and late-day Haleiwa or beach close-ups.
- Capture signature clips at each stop: timelapses, coastal panoramas, blowhole slow motion, surf action, food details, murals, and relaxed POV walking shots.
- Use the right gear: wide mirrorless for landscapes, telephoto for surf, GoPro for water action, and drones only where permitted.
- Build flexibility into the timeline with 15–20 minute quick stops, weather backups, easy parking checks, restroom notes, and no-drone restrictions.
Map Your Oahu Circle Island Tour Shots
Before you even charge the batteries, map your Oahu circle island route in one clean loop so your shots line up with the day instead of fighting it. Go clockwise or counterclockwise and pin every stop with a realistic arrival time inside a 6 to 10 hour window. That simple map helps you catch early light at Diamond Head and softer late color along North Shore beaches. The hour by hour timeline can help you space each stop more realistically across the day. Add parking lots, restrooms, and notes about permit rules or where drone footage isn’t allowed near crowded sand or protected reef. Build in a few backup waypoints too. Weather shifts fast here, and a hidden cove or roadside pullout can save the day. Keep detours honest at 10 to 25 minutes when traffic starts doing island math.
Match Your Shot List to the Route
Once your loop is set, match each shot to the route in the order you’ll actually travel so the light and the scenery work for you, not against you. Start with sunrise glow near Waikiki and Diamond Head Lookout, then move east to Halona Blowhole and Makapuʻu while the ocean still sparkles. On your Circle Island Tour, save surf beaches and North Shore energy for midday, when action and crowds feel alive. Give each major stop a realistic block of time. Full-day routes can handle several signature clips. Shorter van routes need fewer, stronger moments. Keep hidden-gem pauses and turtle encounters ready for story-rich close-ups, and reserve drone establishing shots for iconic bays and broad landmarks. Stay flexible too. If waves fire elsewhere, pivot. If your itinerary includes Makapuu Lookout, plan a wide scenic pass there since it is a featured highlight on many Oahu Circle Island routes.
Pick the Best Camera for Each Stop
Choose your camera the way you choose your seat on the van. Put the right tool where the view fits. For North Shore beaches, fly a drone where permitted and grab broad, glassy coastlines. At lookouts like Diamond Head, bring your full-frame mirrorless with a 16 to 35mm zoom for crisp panoramas and richer dawn color. In Haleiwa, switch to your phone’s portrait mode or a 50mm prime for shave ice, murals, and quick faces between bites. On a route with North Shore stops, keep a lightweight backup camera handy so you can pivot fast between beaches, town scenes, and lookouts.
| Stop | Best camera |
|---|---|
| North Shore surf | Drone or GoPro |
| Haleiwa food and portraits | Phone or 50mm prime |
For water action, use a GoPro in waterproof housing at 4K 120fps. For shaded farms, waterfalls, or twilight interiors, your full-frame with a fast 35mm or 50mm keeps detail clean.
Film Waikiki and Diamond Head First
You’ll want to start in Waikiki at golden hour, when the shoreline glows, surfers cut through clean morning waves, and the Royal Hawaiian and Moana Surfrider catch that first soft light. If you’re coordinating with Waikiki hotel pickup for an Oahu Circle Island Tour, this early start also helps keep your filming schedule on track. Then you can swing to Diamond Head Road’s southern lookout for wide scenic angles of the crater, ridge, and lighthouse before the crowds roll in and the sun gets bossy. If you wrap this section before 10:00 AM, you’ll get smoother footage, easier cutaways, and a strong opening for your island tour.
Waikiki Sunrise Establishing Shots
Often, the smartest way to open an Oahu circle island tour is to catch Waikiki before the day fully wakes up, with Diamond Head holding the horizon in soft gold. Start 30 to 45 minutes before sunrise and lock in a wide 16:9 timelapse from an elevated perch so you catch the coastline, towers, and light shifting by the minute. If conditions allow, send up a stabilized drone for a 10 to 20 second reveal, staying under 400 feet and clear of restricted airspace. Then drop to street level for slow motion B-roll on Kalakaua Avenue and the beach: joggers, surfers, rental stands, sleepy waves. Add a POV walk from Kuhio Beach, plus clean ambient sound and a intro with time, temperature, and visibility. If you continue east after first light, Makapuu Lookout offers one of Oahu’s classic sunrise views for an additional scenic cutaway.
Diamond Head Scenic Angles
As Waikiki shakes off its early hush, point your lens toward Diamond Head and let the island’s most famous crater take over the frame. Start at the Waikiki and Diamond Head lookout with a wide 24 to 35mm shot. You’ll catch the full rim, the skyline, and bright water in one clean opener.
- Pan a 50mm gimbal shot west from the summit shelter at golden hour for warmth and depth.
- Use an 85 to 135mm low angle on the coastal trail to stack crater edge, surf, and surfers.
- Add slow motion trail textures, then a permitted drone rise to reveal neighborhoods, switchbacks, and park scale.
This sequence sets up Oahu before Pearl Harbor, and it makes Diamond Head feel epic without trying too hard today. For a smooth itinerary, frame this opener as part of an Oahu Circle Island Tour so viewers immediately understand how Diamond Head fits into the island-wide route.
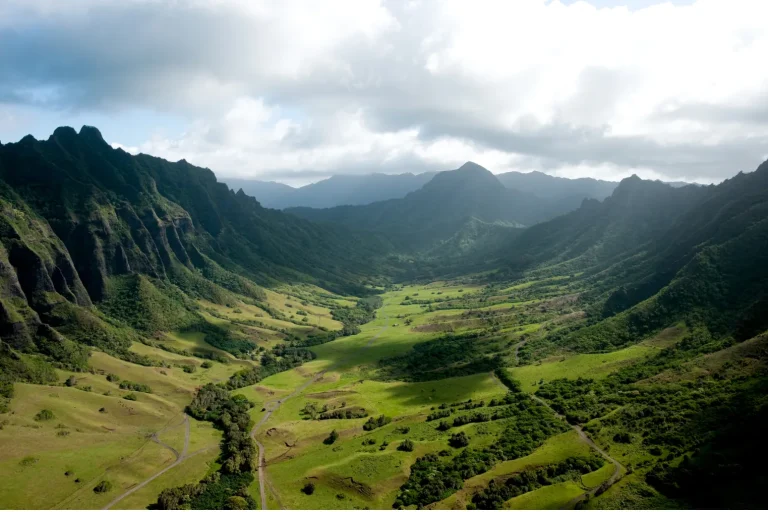
Capture Halona Blowhole and Makapuʻu
You’ll want to set up at Halona Blowhole when the surf is up, where wide shots from the paved lookout can catch 30 to 40 foot sea spouts, jagged basalt, and even those stern warning signs doing their best work. Then you can swing to Makapuʻu Lookout and line up the east Oʻahu coast, Rabbit Island, and any lucky seabird, turtle, or winter whale sightings with a longer lens. If the light starts to turn golden, you’ve got a perfect excuse to stay a little longer and film the clouds sliding past Makapuʻu Lighthouse. This stop is a highlight on many Oahu Circle Island Tour routes because it pairs dramatic coastal scenery with easy lookout access.
Halona Blowhole Angles
Start wide and let the coastline do the talking. From seaward, frame Halona Blowhole against the lava-rock point with Makapuʻu Head beside it, and wait for high tide to add muscle.
- Track a slow-motion plume from the safe lookout at 60 to 120 fps, timing each take with incoming swells.
- Drop low near the lava shelf and aim toward the blowhole entrance. Use ND filters so the water turns silky while spray still snaps.
- Pan the ridge with a handheld or gimbal view so Halona Blowhole sits midframe, while Makapuʻu Lighthouse and Rabbit Island add distance and scale.
The Halona Blowhole is one of Maui’s most memorable coastal wonders, making it a strong visual reference point when planning dramatic shoreline coverage. Grab a few visitor reactions too. Their windblown hair says “Oʻahu” before anyone speaks, and a quick safety note keeps it grounded and useful for travelers.
Makapuʻu Lookout Shots
Basalt cliffs, white spray, and a hard blue horizon make Makapuʻu Lookout feel like Oʻahu showing off without trying too hard. Start with a wide drone or panoramic phone shot above the lookout so you catch the windward coast, Keolu Hills, and Halona Blowhole mist in one clean sweep. Mid-morning usually gives you the clearest view. Then film the blowhole in slow motion from the safe lookout rail when tide and surf kick up. Frame foreground basalt against distant Rabbit Island for scale. At golden hour, zoom in on waves striking the lava shoreline to pull out texture. Add a POV path walk with quick safety notes and best viewing spots, roughly 0.5 miles away by coastline sight. Trust me, it’s a solid sequence. For contrast in your island tour edit, note how Nuʻuanu Pali Lookout is better known for sunrise views.
Shoot Smooth Van and Passenger Scenes
Glide through the van like you’re catching the tour’s quieter heartbeat. Use a gimbal-mounted phone or GoPro at 60fps, and frame riders in a two-thirds profile so the window views and easy movement share the shot. On the Island of Oahu, these in-between moments connect your popular spots with lived texture. If you’re covering logistics too, capture a quick establishing clip tied to the pickup guide so viewers understand how the Circle Island Tour begins.
Catch the van’s quieter heartbeat with smooth, window-lit profiles that turn Oahu’s in-between moments into lived texture.
- Film 10 to 15 second candid clips of passengers cracking into Macadamia Nut snacks or unfolding maps in side-window light.
- Keep ISO under 800, then grab shallow focus close-ups of hands, tour maps, and camera viewfinders.
- Follow the van safely on coastal roads at 45 to 55 mph with a wide lens at 24 to 30 fps for smooth exterior motion.
Think steady horizons and zero seasick footage in the final edit always.
Record the Guide and Guest Reactions
You’ll want the guide on camera at each major stop, giving crisp 30 to 90 second commentary while your phone and lav mic catch every clear word over the wind and surf. Then turn to your guests and catch the real stuff: wide eyes at the North Shore, the quick point toward a turtle, the laugh when the Halona Blowhole sprays louder than expected. Keep a few short exchanges rolling too, because those natural question-and-answer moments show the tour’s rhythm, the guide’s warmth, and why the day feels personal. If you’re filming a Circle Island Tour, grab a quick intro clip that names the full Oahu route so viewers immediately understand the adventure’s scope.
Guide On-Camera Moments
As the day begins at pickup, put your guide on camera for a quick 10 to 20 second intro that sets the tone and the plan. Have them share a name, tour length, group size, and headline stops while you frame the vehicle and smiling guests.
- At Diamond Head, Halona Blowhole, or the North Shore, record 15 to 30 seconds of live narration with one sharp fact.
- Mid-tour, grab a 20 to 40 second spotlight story, maybe tying Kualoa to Jurassic Park or a nearby National Park angle.
- During walks, snack stops, and shrimp truck orders, film quick guide interactions and finish with a concise wrap on photos, videos, and upgrades.
Plan these segments around time at each stop so your guide’s on-camera moments feel natural and never rushed on a circular island tour. Keep them relaxed, audible, and looking into lens like a host all day.
Genuine Guest Reactions
Often, the moments people remember most aren’t the big postcard views but the split-second reactions around them. You should mic your guide with a lavalier at Diamond Head lookout or Halona Blowhole so real-time narration stays crisp beside surprise reactions. Use a handheld gimbal and close-ups for first turtle sightings macadamia nut tastings and shrimp truck first bites. You want raised eyebrows quick smiles and spontaneous laughter. For scenic drive footage, place your reaction cam near the best bus seats so you can capture both guest expressions and the widest Circle Island views at once. Between stops ask each guest for a one-sentence highlight in the vehicle. Mount a second camera or GoPro during scenic drives to catch the guide’s voice and easy comments. Then finish with 10-to-20-second end-of-day emotional reflections about the memory that stayed longest. Get on-camera release consent before recording anyone at all. It keeps footage usable and trustworthy.
Candid Shared Interactions
Capturing shared moments starts the minute your guide says hello at pickup, so get a time-stamped shot with name tags in view and a quick itinerary rundown that shows who’s leading the day.
Then keep your camera ready for the first local jokes, the shared playlist, and any memory prompts that spark stories.
- Close-up phone shots when Diamond Head appears
- Wide GoPro frames for group chatter
- Natural audio at shrimp trucks and shaved ice stands
At beach stops, film laughter, pointing, and kids running in slow motion, then add a drone pull-back for scale. When your guide shares Hawaiian history, catch nods, smiles, and one-line reactions that sound fresh, salty, and real. Ask what surprised them most, and let the answers breathe on camera. If your footage is meant to help viewers plan ahead, mention that this day follows an Oahu Circle Island Tour route so the reactions feel tied to the full experience.
Film Macadamia Farm Tastings and Coffee
Start at Tropical Farms, where the story gets crunchy fast. Open with 4-to-6-second slow-motion close-ups of nuts cracking and shells falling, so viewers feel the snap and see the texture. Then film the free tasting table for 10-15 seconds, catching guests sampling salted and honey-roasted varieties, packaging labels, and tasting table signage for clean product ID. Add a 15-to-20-second voiceover along the orchard rows that explains harvest, drying, and roasting, while nodding to farm sustainability and smart macadamia flavor pairings. This stop highlights Macadamia Nut Farm appeal on Oahu and helps anchor the island tour with a distinctly local experience. At the café, grab 5-to-8-second candid clips of guests sipping complimentary coffee, plus a medium shot of a barista making pour-over coffee. If weather and permission cooperate, fly a brief drone pano overhead, then cut inside to products and price tags that invite browsing.
Capture Food Trucks, Shrimp, and Shave Ice
Head to the North Shore food-truck lots at peak lunch, roughly 11:30 a.m. to 1:30 p.m., and film wide shots of favorites like Giovanni’s and Fumi’s with the lines, signage, and truck exteriors all in frame.
Keep clips rooted in truck culture, because lunch lines won’t wait there for a second take.
The best shrimp trucks on Oahu’s North Shore deserve a quick establishing pass before you move in for tighter food details.
- Shoot macro shrimp in garlic butter and hot oil. Capture sizzles, steam, and a two-second sauce drizzle for richer flavor profiles.
- Follow the service rhythm: orders, cash, paper trays, lemon wedges, and first bites from happy customers.
- Film shave ice overhead with syrup stripes, condensed milk, and azuki beans. End on local vendors and bright colors.
Shoot Waimea, Sunset, and Pipeline Action
You’ll want to frame Waimea, Sunset, and Pipeline with a mix of wave power and crowd buzz, from clean mid-morning bay views to winter peak sets thundering near shore. You can track surfers paddling into heavy lines, then switch to tight shots of barrel rides, wipeouts, and slow-motion drops while cheers rise from the bluff. Don’t forget the scene around the action, because vans, surf shacks, judges’ flags, and salt-sprayed spectators give these breaks their full North Shore pulse. Waimea Bay stands out as a tropical shoreline escape that adds scenic contrast to the heavier contest energy.
Surf Break Action
Chase the North Shore when the surf wakes up and the whole coast seems to lean toward the horizon. You frame wave dynamics at Waimea during mid-tide, especially in winter, when faces climb past 20 feet and serious riders commit.
- At Sunset, catch golden-hour longboards and right-hand reef lines with a 70–200mm.
- At Pipeline, shoot 120–240 fps for barrel exits, lip hits, and flying spray.
- Mix wide aerials, jet ski follow shots, and tight telephoto angles, while noting surfer etiquette and beach safety.
You record the shore break roar, surfer calls, tide and wind details, plus signs and judges towers for clean edits. If drones are permitted, use them sparingly. The ocean already shows off enough for everyone during peak north swell intervals too. From November through February, big-wave surfing viewing is at its best along the North Shore, but warning signs matter because these breaks can be dangerous even for experts.
Shoreline Crowd Energy
Often, the beach tells the story before the surfers do. At Waimea, you start early at low tide and shoot the broad shoreline as surfers arrive, giving the crowd room to build naturally. At Pipeline, you chase midday energy, catching cheers, shuttle buses, food trucks, and expert rides from a safe distance with a telephoto or permitted drone. Then you roll into Sunset during golden hour, where silhouettes, spray, and slow motion turn the beach into theater. Film handheld reaction shots at eye level so faces feel immediate. Use gimbal shifts between stops, and let surf, ambient music, and chatter carry the pace. Keep an eye on local vendors and evening bonfires too. They add texture, and remind you that the sand has its headliners. If your route allows, a quiet cutaway at Laniakea Turtle Beach can balance the high-energy surf scenes with a calmer shoreline moment.
Film Turtle Beach Without Disturbing Wildlife
Usually, the best turtle footage starts when you stay back and let the beach set the pace. You’ll get more natural shots by keeping a respectful distance and leaning on zoom instead of your feet.
- Hold 10 to 15 feet back, leave the path open, and practice quiet observation with no flash, fast moves, or excited chatter.
- Film in short 5 to 10 minute bursts, then rotate spots. If a honu speeds up or slips into the water, back off.
- Follow drone etiquette. Check signs, ask your guide about protected zones, and never launch near turtles or in restricted airspace.
A long lens catches sandy shells, slow flipper shifts, and sleepy blinks without bothering anyone. Stay patient, not pushy. Turtles win, so does footage. On a circle island route, you can also cut to a distant establishing shot of Chinaman’s Hat, Oahu’s iconic islet, to add local context without approaching sensitive shoreline areas.
Add Haleiwa Drive-By and Street Scenes
Roll into Haleiwa slowly and let the town give you its best little moments. From the passenger window, grab a steady 20 to 30 seconds along Kamehameha Highway at golden hour. Let Haleiwa storefronts, painted walls, and the famous Haleʻiwa sign drift through frame. Then hop out for mural closeups and quick 10 to 15 second shots of shave ice stands, shrimp trucks, and lines of hungry regulars.
Keep your gimbal ready for 5 to 10 second street scenes. Follow bicycles, surfers carrying boards, and the easy pedestrian choreography near crosswalks and sidewalks. From the bridge, pan wide across Haleiwa Harbor and nearby breaks for boats, sets, and town texture. If the farmer’s market or art stalls are open, catch produce, macadamia samples, and vendor chatter too.
Film Dole Fields and Movie Sites
Leave Haleʻiwa’s surf-town rhythm behind and head inland where the landscape shifts into neat pineapple rows and movie-set scenery. At Dole, you can open with drone sweeps, if permitted, then track slowly along garden paths and vintage rails for texture and cinematic lighting.
- Grab macro shots of crowns, rough skin, and a chilled Dole Whip bite.
- Note pineapple sustainability and local vendorstories in quick captions.
- At movie sites, add geotags, split screens, and guide facts for continuity.
Follow each wide establishing view with detail inserts from Jurassic Park or 50 First Dates, so your montage feels grounded, informative, and just a little starstruck. Hands tasting pineapple sell the flavor. Signs, rails, and shadows give you plenty to cut on without forcing the nostalgia too hard.
Leave Time for Hidden Oahu Stops
Build in a little room to wander, because Oahu often hides its best footage just past the obvious pullout. Set aside 30–45 minutes for hidden stops, and keep a flexible one- to two-hour buffer during a full-day loop. Ask your guide to flag three to five favorites ahead of time, so you can chase hidden lookouts, secret hikes, or a Local vendor near a quiet beach. Golden hour works best, about an hour after sunrise or before sunset, when light softens and crowds thin. Give each stop 15–20 minutes for quick captures and easy parking. If you’re booking private or upgraded transport, leave room to swap stops when tide pools, coves, or farm stands tempt you off the main route today for better shots.
Organize and Deliver Your Tour Gallery
Sort your footage while the salt spray and roadside snack stops still feel fresh, and your Oahu gallery will be much easier to share. Curate 40 to 80 edited photos and 8 to 12 short clips from your phone, GoPro, and drone when weather cooperates.
Sort your footage while the salt spray still lingers, and sharing your Oahu gallery will feel effortless later.
- File by stop and type, from Diamond Head to Haleiwa, using a naming convention like YYYYMMDD_Location_Device_##.
- Send a web gallery and ZIP with high-resolution JPGs, 4K clips, and a 60 to 90 second highlight reel.
- Set a clear delivery timeline of 5 to 7 business days and a revision policy with two minor rounds.
Add a quick start guide with captions, crop tips, and timestamps. Offer souvenir video or extra retouching for an added fee.
Frequently Asked Questions
Do I Need Permits for Drone Filming on an Oahu Circle Island Tour?
Yes, you’ll usually need authorization for drone filming on Oʻahu tours: follow FAA rules, secure Local permits for parks or beaches, and respect Cultural restrictions at sacred sites. Apply early, and also get consent when needed.
What Time of Year Offers the Most Reliable Weather for Filming?
You’ll get the most reliable filming weather from May through September, during Oʻahu’s dry season, when trade winds keep mornings calmer. Start before 8:00 AM for golden hour light, clearer skies, and smoother drone flights.
How Much Storage and Battery Capacity Should I Bring?
Bring 256–512 GB minimum, plus Fast transfer cards and Redundant storage for backups. You’ll want High capacity batteries: three drone packs, 2–3 GoPro/phone spares, and a 20,000–30,000 mAh power bank to keep filming all day.
Can I Use Tour Footage Commercially or for Client Marketing?
Like a telegram from heartbreak, you can’t use tour footage commercially unless you’ve secured usage rights, copyright clearance, and model releases; you’ll also need written permission for private locations, attractions, and any restricted drone filming.
What Clothing and Gear Should I Pack for Changing Island Conditions?
Pack Light layers, Waterproof outerwear, and Convertible trousers so you’re ready for sun, wind, and showers. Add grippy water shoes, reef-safe sunscreen, a hat, sunglasses, a reusable bottle, charger, and microfiber towel for changing conditions.
Conclusion
By the time you loop back to Waikiki, your “simple” island drive has turned into a neatly packed archive of salt spray, rooster calls, food-truck smoke, and sunset gold. You’ve chased schedules, permits, parking lots, and turtle rules just to catch a place that looks effortless on camera. That’s the irony, of course. Oahu rewards planning with moments that feel unplanned. Keep your batteries charged, your stops flexible, and your eyes open. The best clip may be the one you didn’t expect.